

How To Install Ceiling Tiles On Furring Strips

Ceiling Tiles
Over the concluding few decades the apply of ceiling tiles was primarily for finishing basements and utility rooms. The plainly or embossed 12 inch by 12 inch ceiling tile is easy to install, does not require special equipment and is relatively inexpensive.
The installation of ceiling tiles is definitely a DIY home handyman project that will become a valuable home improvement.
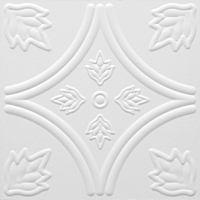
Figure 1 - Ceiling tile with intricate pattern
However, over the by 10 years ceiling tiles have changed in texture, many of intricate patterns, every bit shown in Figure 1, and coloring and are now being used as a ceiling finishing material for all the rooms in a home.
The vast bulk of ceiling tiles are designed with a tongue and grove and are made of fire resistant fiberboard. They are bachelor in 12 inch by 12 inch and 12 inch by 24 inch units.
As shown in Figures two through 7 ceiling tiles are now being used in nearly every room in a home to add warmth, charm and character
Click on picture for larger paradigm.

Effigy 2 - Ceiling tile in finished basement

Effigy 3 - Ceiling tile in family unit room

Effigy 4 - Ceiling tile in kitchen

Figure 5 - Ceiling tile in living room

Figure 6 - Ceiling tile in 1000 room

Figure vii - Metallic ceiling tile in finished basement
Installing Ceiling Tiles:
Ceiling tiles can be installed with agglutinative, if the ceiling is currently made of a solid material such as drywall or they tin be stapled or nailed into position on furring strips if the currently ceiling is open to the ceiling beams or if the material is not solid, such equally cracked and damaged drywall.
Cutting tiles should be placed at the outside edges of the room. The virtually pleasing aesthetic installation has the same size edge tiles at sides and ends of the room. Try to keep edge tile size to an amount greater than half a tile.
Measure the room at both ends and in the heart. Use the smallest dimension, in both directions to summate the size of the edge tiles. The dimension volition well-nigh likely not be evenly divisible past 12 (the size of one tile), hence a tile will have to be cutting. In society to go on the edge tiles larger than one-half a tile, use the inch amount and add together 12 and split by 2.
As an example if the room is 10 feet, 4 inches square; add together 12 to the four which is sixteen and divide past two which equals 8. Hence the border tiles on both sides will be approximately (considering the room will not be perfectly true) 8 inches.
Both the length and the width of the room must be calculated for edge tiles, as shown in Figure 8. Hence the corner tiles may crave cut in both length and width.
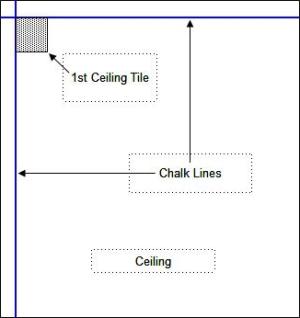
Effigy eight -Installing first ceiling tile
Snap a chalk line at 8 inches (use your dimensions) out from the edge of a wall along the length and width of the room and start installing the tiles, as shown in Effigy 8.
Furring Strips:
If you are using furring strips, it is important to calculate where the edges of the tiles will be earlier installing the furring strips. The edges of the tiles must fall in the center, on the face of the furring strip for a good installation, as shown in Figure 9.

Effigy nine - Right position of ceiling tile on a furring strip
Level the furring strips using a laser level and shims. Ceiling tiles have some flex and volition follow the contour of an ceiling that is non level.
Annotation one: If yous are installing a molding around the outer perimeter of the ceiling, all edge tiles may be cut using the formula as small gaps between the ceiling tile and walls will be hidden by the molding. If you are non using a molding than all the tiles must be cut to the exact width between the chalk line and the wall.
Annotation two: Cut the tiles, face side up using a very sharp utility knife and a metal directly edge. Ability saws have a tendency to damage the face of the ceiling tile material.
Note 3: A finished cut corner tile should have the tongue and grove facing into the room to take and lock into the next tiles.
The website is 100% free. If y'all click on an advertizement or link we may receive a fee or a commission if you purchase an item.
Contact the staff at Renovation Headquarters
©Copyright-2022 all rights reserved.
FTC Disclosure

Source: https://www.renovation-headquarters.com/ceiling-tile.html
Posted by: teetersbefiscure.blogspot.com
0 Response to "How To Install Ceiling Tiles On Furring Strips"
Post a Comment